Friday, May 30, 2008

Striped Grey Afghan


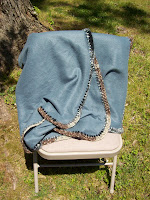
Hi! I finished this blanket up yesterday, and wanted to post a picture of it here. I made it for Sweet Dream Blankies charity, that I started, to make blankets for kids as they go into the foster care system. You can read about it more, by going here. It's made based on a seed stitch type idea, only I used double crochets instead of singles, and 2 in each space, instead of a chain. It was based on an afghan that used a seed stitch, but I didn't want an afghan that was THAT thermally warm, but something that was nice anyway. The length was good, at about 48", but the width was a little smallish, at about 30". If I hadn't run out of yarns, I would have made it a little wider. It's made with 2 strands of yarn held together. I used about 3 1/2 skeins of Red Heart Super Saver in grey (that's about 25 oz. or so) and not more than 4 oz. of any of the solids, maybe a little less. But then again, I would suggest putting one more row of color in, to make it a good width. With one more band of color, it would take a full 4 skeins of grey, and just one more color.


Here's the pattern:


With an N hook, chain 85 loosly


Row 1: sk first chain, sc in next chain, ch 1, sc in next chain, across turn


Row 2: ch 3, sk first sc, in first chain of row 1 make 2 dc. sk next sc, 2 dc in next chain space, across. In last sc, do 1 dc. turn (at end of each row, turn)


Row 3: ch 3, 2 dc in space between last 1 dc, and 2 dc cluster. 2 dc in each space made between each 2 dc cluster from row 2. At end of row, 1 dc in last dc.


Row 4: Repeat row 3 for as many rows as desired width.


Last row: ch 1, sc in first dc, ch 1, sk 1 dc, across, to mirror the first row


Boarder:

I simply did a round of dc evenly spaced all the way around, with [dc, ch 2, dc] in the corners, with the main color, grey.


Here's my stripe pattern, but feel free to use whatever pattern you would like:

1-5: Grey (5 rows)

6-7: Yellow (2 rows)

8-11: Grey (4 rows)

12-13: Orange (2 rows)

14-17: Grey (4 rows)

18-19: Green (2 rows)

20-23: Grey (4 rows)

24-25: Blue (2 rows)

26-30: Grey (5 rows)


Perhaps you could have a row of red, or purple, and make it a rainbow. :)


I would love to see pictures, if anyone makes this up! This pattern has not been tested, so if you find an error (VERY likely) please let me know! Thanks!

It is FINISHED!!!


Hi everyone! This is a blanket that has been a long time in making... The squares were each lovingly made by members of crochetville, as we began our spring round of the secret pal swap. Overall, about 200 squares were mailed to me to be used for this project, as well as to be made into tote bags. There are two tote bags pictured on this blog, and this afghan, is made by some of the same people. This afghan will be auctioned off to raise money for the upkeep of the website, http://www.crochetville.org/ as all of us from there want to see it keep going! :)


The first picture shows the afghan from the right side. I didn't think about it at the time, but I put the tags with who made each square on the right side of the afghan. So, without taking off the tags, it's hard to tell what the afghan would look like from the right side. The side without the tags is a back view, which gives you a pretty good idea of how it'll look once the tags are gone. :)


Here's a list of who made which square. The names are listed, from the picture with the tags, so it starts with the top left square; the off white/grey square, and works left to right, top to bottom, just as if it were a paragraph that you were reading. Oh, keep in mind that some people who sent in squares may not have a square in this afghan, and some may have more than one. I tried to make as organized of an afghan as I could, but use the most variety of squares that I could. So, here's the fine list of people who sent in squares that became this afghan:

Top row:
Tracy in Ontario Canada
Lynn in Coal Twp, PA
Carol in Egg Harbor Township, NJ
Annon. in Garfield Hts, OH
Linda in Port St. Lucy, FL

Row 2:
Lynn in Coal Twp, PA
Rosemeri from Jacksonville, FL
Alice in Clinton Twp, MI
Meilssa in Leighton, PA

Row 3:
Rosemeri from Jacksonville, FL
Joyce in Ft. Wayne, IN
Alice in Clinton Twp, MI
Meilssa in Leighton, PA
Joyce in Ft. Wayne, IN

Row 4:
Melissa in Leighton, PA
Annon. in Garfield Heights OH
Carol in Egg Harbor Township, NJ
Jen from Montgomery, NY
Linda from Port St. Lucy, FL

Row 5:
Carol from Egg Harbor Township, NJ
Melissa from Leighton, PA
Jen from Montgomery, NY
Wendy from Australia
Tristi from Galloway, OH

Row 6:
Carol from Egg Harbor Township, NJ
Jen from Montgomery, NY
Joyce from Ft. Wayne, IN
Linda from Port St. Lucie, FL
Lynn from Coal Twp, PA

Row 7 (bottom row):
Tena from Albion, PA
Betty from Selesgrove, PA
Carol from Egg Harbor Township, NJ
Lynn from Coal Twp, PA
Rosemeri from Jacksonville, FL

Everyone did an amazing job! I'll post here when I get the details on when and where you can bid on this beautiful afghan. :) It measures approximately 35"X50", which is a good lapghan size, or small throw for a couch. It is sure to go with the colors of just about any livingroom!

Thank you so much for giving me the chance to make this afghan! It's been a pleasure!

Victoria

Monday, May 26, 2008

Drawstring Bag for Kids


Hi! I just finished up this drawstring bag, and it looks pretty good if I do say so myself. :) It's made with two strands of acrylic worsted weight yarn held toghether throughout (except for the handle) and a size L hook. It took almost the whole skein of veriegated yarn, so if you had a skein of veriegated (5 oz. Red Heart pictured) and a solid skein (just under 5 oz. partial skein) then you should have no problem making this. You can always make them larger as well. This one holds 6 large, 7 oz. skeins of Red Heart yarn inside, to give you an idea of size. I designed these to be used for bags to hold goodies for the kids in foster care. I'm going to use ziplock baggies probably, for holding anything small like crayons in the bag, as the holes are definately big enough for things to slip through. I'm also looking for anyone who might like sewing enough to do some linings for these. Without further ado, here's the very basic pattern (please, you can sell items made from this if you wish, but don't sell the pattern) If you like this pattern a lot, feel free to make one and send to our group here. This has not been tested by anyone but me, so let me know if you find any errors. Thank you!


Materials:

5 oz. each of 2 contrasting colors (veriegated pictured, but 2 solids, or even two of the same color would work just fine)


L hook (K, M, L, N, all would work just fine, whatever is comfortable for you


Directions:

Row 1:ch 4, in 4th chain from hook, work 11 dc join with sl st in top of ch 3


Row 2: ch 3, 2 dc in same space as joining, and in each dc around (24 dc, the ch 3 space doesn't count) join to top of first dc (skip the ch 3)


Row 3: ch 3, 2 dc in same space as joining, 1 dc in next dc, 2 dc in next dc, 1 dc in next dc, around. (36 dc total) again, join in top of first dc in this row and every row from here out.


Row 4: ch 3, 2 dc in same space as joining, 1 dc in each of next 2 dc, 2 dc in next dc, around


Row 5: repeat row 4


Row 6: ch 3, 1 dc in same space as joining, and in each dc around. Work these in the back loop only of the row, and it will make a little ridge that will be on the outside. This helps the bag stand up a little better, and gives it a little decoration I guess. :)


Row 7-desired height (I did 13 rows of dc in the picture): ch 3, 1 dc in same space as joining, and in each dc around, going through both loops. You could definately do a row where you go just in the back loops again if you like, just change it up and be creative.


Last row: 2 dc in each dc, to make a frill edge. Leave out if for a boy.


Handle:

With one color, and H hook, make long tail (10 inches or so, do NOT weave this in yet, it will be used to sew the handle to the bag at the end) ch 40-45 (I did 40 and I think it's ok, but could have been a little longer)


sk first ch, and sc in each ch to end


continue, sc rows until piece is about 1 1/2 inches, or about 6 rows. I would suggest, making it an even number of rows, and then making a long tail when you finish off. This way, there is a long tail on each end of the handle, that you can use to sew it to the purse.


Sew one end of the purse (whipstitch is what I did) along the ridge row, and the other end along the row just before the frilly row.


Drawstring:

Make a drawstring by chaining enough so that it is about 4" longer than going around the top edge of the purse. Finish off, weave in ends, and tie the two ends of the drawstring together. This isn't how I did this drawstring, but I didn't like how I did it. There are a number of ways to do a drawstring, so just do what you're comfortable with if you don't like long chain rows. I also will do a long string, then twist it, until it twists on itself, tie a knot, and weave it through.


Enjoy!

Friday, May 23, 2008

Lizard Blanket!


Hi! I made this blanket a while back, and have just had it to the side waiting to be given to a child in foster care. I'm trying to get several made up to give at once, and I've got 2 now done! :) Yipee! This one was made with some fleece that a wonderful woman from crochetville gave me, and is plenty big enough for a child, even as they become a teen (I didn't measure it, but it's got to be 40"X55" or larger). Thank you so much!!! The fleece is really nice quality, and it's hard to find something as cute as this here in our small town Wal-Mart. I also made up a little baby blanket out of the same fleece, and will be making it's twin soon, to post when I'm done. Those will be for the NICU in Huntsville, for the Project Linus there.

Booties and Hats, OH MY!!


Hi! Here's a picture that doesn't do these little hats and booties justice! They were mailed to me from Tina, who is a member of From the Heart of Texas for me to donate to our local Project Linus for preemies in the NICU in Huntsville, Alabama. THANK YOU SO MUCH!!! They're adorable! I love how you were not afraid to stray from "baby" colors. Don't you just love the cammo set? Thank you so much! I've got a couple fleece blankets (see other pictures) that these will go well with, and I hope to make up a cammo blanket too for that set. Too adorable!

Wednesday, May 21, 2008

Rectangle Granny Afghan


Hi! I finished this afghan up recently, had it 1/2 finished for a while, but it's done now! It's made with Red Heart Super Saver yarn, about 12 oz of each of the solid colors, and about 3 oz of the verigated color, and a J hook. You can find the pattern here, by Erin Lindsay. This blanket will be going to the local (Athens, Alabama) DHR in my city here, and will be loved by a little girl. It is a good lapghan sized blanket, perhaps about 40"X 50" or so; not sure. I just made it until it would fit over me comfortably, and cover me up a bit. :) If you would like to make blankets for your local DHR office, just do a search for DHR in your state, then find your local office. E-mail them, letting them know what you'd like to do. The one here in Athens was very quick to call me back, and sounded so surprised that anyone would want to do something like this. If you would like some ideas, and perhaps more help in contacting your local DHR, please check out my VERY NEW (tonight) charity yahoo groups website here, called Sweet Dream Blankies. Thank you so much for reading this, and have a great night!

Kit and Kaboodle Swap Scarf Finished!


Hi! I was recently in a swap with KarenC from crochetville, and we swapped kits to make an item. She sent me a great pattern, yarn, and hook for a cabled scarf. The yarn used was Moda Dea Superwash Wool (I've never used it, it's WONDERFUL!), and the hook was an I, Susan Bates Bamboo handled hook. I've never seen these either, but it was such a joy to work with! I can't wait for cooler weather (oh, about 4 months away?) to wear this one. It turned out very long, probably close to 6 feet long. It's wonderful! I'm probably the only person in Alabama who wore a scarf today, if only to try it on. Thank you so much Karen! I hope you like my sock kit that I sent you! :)

Crochetville Purses!!


Hi! Here are some pictures of the crochetville tote bags that I've made up for prizes for the Secret Pal Swap for last round. It's taken me a while to complete them, and they don't have their linings in yet (my sewing machine has been down...) but here they are! The blue one was made using just squares from laughlovehook (screenname) from Ohio. They were joined in black, and I put a black crochet handle on them. I think it turned out really nice! The pinks one was made from squares from the following people:
Ashley in UT
Rosemeri in FL
Melissa from PA
Laughlove hook from OH (the unmarked squares)

These ladies did a beautiful job on the totes, and the winners of the drawing will love them, I'm sure. Thank you for helping with this! I'll be working on more for this round's prizes, as well as possibly an entire afghan to auction off to raise money for crochetville. Thank you so much for helping! More to come!


Sunday, May 18, 2008

Victory V-Stitch Scarves


Hi! I've just finished up these scarves today, and they'll be going to this cause, which gives scarves to women who come to the hospital after being abused. I love to use the V-Stitch, because it is quick and easy. I made these out of Lion Brand's Homespun yarn, that I got on clearance at Hobby Lobby. The purple skein was a donation for me to make something for charity with from a friend.


The pattern is really easy! I used a K hook, and they came out about 5" wide, by about 60" long; just right.


Ch 16, in 5th ch from hook [dc, ch 1 dc], sk one chain, [dc, ch 1, dc] in next chain, sk 1 chain, across.


ch 3, turn, in each ch space across, work [dc, ch 1, dc]


Continue until you reach the length that you'd like. :) It takes up exactly one skein of homespun to make the dimensions just right for this charity. I tried making it one V-stitch wider for the purple one, and it only came out about 4 feet long, but it'll still be used I'm sure. It's about 7" wide too.


Enjoy! Please don't sell this pattern, since it's really just the stitch anyway, but you can sell finished items made from this. It's just a simple pattern for anyone who would like to try the V-Stitch. V for Victory over Violence.

Saturday, May 17, 2008

Crazy Afghan


Hi! I made this afghan a while back, but I just haven't mailed it out anywhere yet. It's really a fun afghan, made with many different sized squares. Through my charity yahoo group I asked members to send in crochet squares of any size they wanted to. Then, I gathered up several, and made strips of them that were the same length, although different widths. Then, I just sewed them together, and I have a nice afghan that is a lot of colors! I'll definately be making more of these, as I have a few more random sized squares here and there. It makes it a lot easier than trying to get 40 squares all the same size, I just got about 10 at a time, depending on the size, evened out.


I'm still not sure where I'll send this one, but likely, either to my local Project Linus group, where we donate afghans to hospitals, nursing homes, homeless shelters.


This would be a great project for anyone who has "homeless squares" from those projects where you think you're going to make squares for a blanket, but after 5 or so, you decide the pattern is just not worth it. You know what I mean. :) The only thing I'd mention though, is that I tried not to put two squares of the same color next to eachother. Otherwise, it's random! Enjoy!

Pink/Black Shawl


Hi! I just finished this shawl, that I thought I'd never finish! It's not that it was difficult (very very easy actually) but I just kept putting it off. What happened, was that I was doing the boarder, and I ran out of yarn about 6" from the end, and was not looking forward to having to weave in ends just to do a little area. However, I just wanted it done, especially since it's for a good cause, so here it is! It's for another charity at crochetville and I read about it here. Ann is a wonderful woman, and I'm glad that I can help out with this cause. She's asking for scarves, but I thought this shawl would be nice for a teen, so it'll be mailed out to her soon. Plus, she said she'd love it for them too.


In the spirit of giving, since so many people have posted patterns that I've used, I'm going to post the pattern here, although it's really more like guidelines than a pattern. :)


Materials:

approx 10 oz each of 2 colors. I really can't remember for sure, so if you make it, would you let me know?

I used red heart 100% acrylic for this, in black and a rose pink. When the strands are held together, it makes a very fast shawl, and I used a K hook. Pattern will be written to accomidate any combination of hooks, and yarn that you have on hand. This stitch is a box stitch, and there is a link to a much better tutorial on how to do it at the bottom. Be sure to only turn work where mentioned, it's a little different. The piece will look like a triangle for many rows, until it is as wide as you need it, then you work on the length and it will look ilke a rectangle with a triangle piece missing. I know it sounds strange, but just try it! :) I've also made it without the decrease rows, to make it a triangle, then do the edging. Have fun! It works up very quickly...


Directions:

Row 1: Holding two strands together at the same time, chain 6. In 4th chain from hook, dc, and dc in next 2 chains.


Row 2:

ch 6. In 4th chain from hook dc, and dc in each of next 2 chains. Turn work, Sc in ch 3 space left from row 1, ch 2, 3 dc in ch 3 space. Think of walking up stairs as you do this, and it will all make sense...


Row 3:

Ch 6, dc in 4th chain from hook, and in each of next 2 chains. Turn work, sc in first ch space from row 2, ch 2, 3 dc in same space. Continue just as row 2.


Repeat row 3 until piece is a triangle, with the straight edges measuring approx. 20"


Decreasing rows:

This is not tricky, but perhaps hard to explain. But, the idea is that you will keep increasing on one side (what you've been doing so far) and you will decrease on the other side, so that you end up with the same number of little blocks or stairs on each row. This way, you will work until the piece measures aprox. 60" long, which is about right for a shawl. You can make it bigger or smaller for your taste.


How to decrease:

First row of decrease, at the last dc of previous row, turn, and sl across the 3 dc. Ch 3, 3 dc in same chain space, sc in next ch space, ch 2, 3 dc in same space, across. Then, at the end of that row, do it just like the ends of row 3


Row 2 of decrease:

Start this row just like you start row 3's, so that it will get longer on this side. Work across, then at the end of the row, sl into the chain space, turn work, sl in 3 dc from previous row, sl into chain space, ch 3, 3 dc in space, and work across just as before.


When you're finished with the rectangle part, you'll be ready for the edging. You will only be working in the chain spaces, so that will mean every other box area you'll do 6 dc. That's all there is to it! Here's the WONDERFUL tutorial on how to do this stitch, with tons of pictures on how to do it and everything.

Copyright note:

All I ask is that you not sell this poorly written pattern, nor the pattern that it is linked to. You can sell finished items made from this, or whatever you'd like, but just don't sell the pattern. I'm offering it as a gift to anyone who would like it online, and would like it to be kept free. Thank you, and have a great day!

Grey Blanket


Hi! I've had this blanket finished for a while now, but just didn't know whom to donate it to. Earlier today, I was visiting crochetville, and I saw this thread about a wonderful woman who is gathering up 100 blankets to be given to men and women in a local nursing home for Christmas. So, I'm packaging this one up to send to her, as it's a good lapghan size, probably for a man. What a great project! Thank you for the work you do, and for letting me help out! I'll be sending more, I hope! It is made using fleece I purchased from Wal-Mart (you've got to love the remnants' section hehe), and some "I love this yarn" purchased from Hobby Lobby. I really do love that yarn, because it makes a neat self striping type thing, and it is very soft. It was also purchased on sale. :)

Fleece Edging Patterns


Hi! I've decided to publish two edgings for fleece blankets that I've used, in the hopes that others will be able to use this too. The only thing I ask, is that you not try to sell this pattern as your own. It is very simple, but I have not seen it anywhere, so I'm assuming that I'm not breaking any copyright laws.

I use an edgerydoo to get the holes just right, but use whatever you would like, to make holes about 1/2 inch apart. I use a size B hook (or size 5 steel crochet hook, whichever I have on hand) to do the foundation row, so that the tiny hook will go through the holes I made pretty easily. Then, I use anywhere from an H-J hook, depending on the yarn used. My favorite combination, is to use Caron Simply Soft yarn and a size I hook, but just as long as it lies flat, any combination will work. I've also used fingering weight yarn, as well as thicker worsted such as Red Heart acrylic. One 6 oz skein of Caron Simply Soft yarn is enough to do edgings on 3 baby blankets (approx. 30" square), so I guesstimate about 2 oz. of yarn to make one.

Foundation row:
In each hole around, start with one long single crochet. This just means, insert hook in hole, pull up a loop even with the top of the fleece, and continue like a regular sc. It takes a couple times to get the size just right, and the fleece will curl under from time to time, but it'll look just fine. So, after you've done the sc, chain 1 or 2 (depending on how far apart the holes are), then sc in the next hole, all the way around. If 2 chains make it draw up, then try 3. If you're using thin fingering or laceweight yarn, you will need 3 chains, and possibly 4. If you're using a thick worsted weight, you will probably only need 1, possibly 2 chains. Then, join with a sl st to first sc.

Now, depending on what color your fleece is (for girl or boy) pick one of the following:

Girl's edge (the shell edge)
sl st into first chain space, and then ch 3. Make 2 more dc in that space. Then, sc in next chain space. 3 dc in next ch space, sc in next ch space, around. If you are using fingering weight yarn, you may need 4 or 5 dc in each space to make it lie flat. Just play with it a little bit. When I use caron ss yarn, I only need 3 dc to give you an idea. Join to the top chain of the begining chain, and finish off.

Boy's edge (straight edge, also good for neutral whites, greens, yellows, etc. blankets)
sl st into first chain space. Ch 3, dc in same chain space. Then, 2 dc in each chain space around. Another variation, would be to do 1 dc in each ch space, and 1 dc in each sc from the foundation row. I like to just work in the spaces, because I can find it faster, and it looks the same to me really. Join to the top of the begining chain, and finish off! You're done!

These don't take very long at all to do, and I'm thrilled to be able to share this pattern with everyone! Enjoy!

Fleece Blankets, FINISHED!


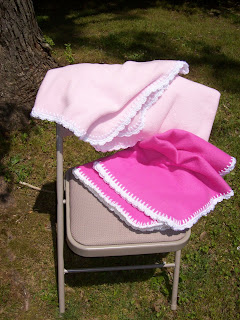
Hi! Here are pictures of some fleece blankets that I've recently completed, for the local Project Linus group, that will give them to babies in the various hospitals in the Huntsville/Madison Alabama area. These were all made with fleece that was given to me by a very generous lady, who will remain anonymous. Thank you so much! The pattern for the edging is my own, but I will post it here to share. It is very basic! With one yard of fleece, you can cut it just right so that you get one piece big enough for a child's blanket or lapghan, and then 2 more newborn size blankets. That's why I usually have 2 of a color the same size (like the solid pinks on the right, and the solid purple on the left). This works out really well though, because these will be used in the NICU of a hospital. Many times twins (or larger multiples as well) will need to spend some time in the NICU before they go home. I try to make the edging a different color for each twin, because they are different people after all. However, I can't always do that if I don't have yarn that will match. I really enjoy doing these, and I know they'll be used.

Thanks for reading!

New Blog, First Post!

Hi! I'm starting this blog, so that I can post pictures and thank yous to all the wonderful people who have donated things to my charities, or to me personally, to be made into items for charities. I wanted one place where I could post all these thank yous, to keep track of it all. :) In the past, family, friends, and complete strangers have donated yarn, material, and completed items so that I could give them out to various charities that I make items for. I'm not looking for recognition myself, but want to thank those who have helped me help others. Thank you, and enjoy!